Things to do When Windows 8 (8.1) Fails to Boot
PC Problems, Windows 8, Windows 8.1Windows 8 is well known for its quick boot capability. The OS however, sometimes itself abandons this property by not booting at all . At such an occasion, the only place you can consult with is the Startup Recovery options. However, accessing these options is not possible in Windows 8, until you have enabled it already. To address this problematic situation, you would require a Windows 8 Recovery Drive or Windows 8 installation disc. Before getting on to the solution, let us give you an overview on how this particular issue might have occurred.
For common PC issues, Junk files unclogging, boosting System performance, speeding up Internet and other underlying Windows concerns, we recommend using this tool.
- Step 1 : Download Systimizer ‒ PC Cleaner & Internet Booster (Effective with Windows 10, 8, 7 & XP)
- Step 2 : Click "Scan" to analyze your PC
- Step 3 : Click "Fix" to wipe out all bumps
Causes
- Boot Loader containing the boot instructions, could have incorporated issues
- Windows 8 System Files could be damaged, corrupted, or destroyed.
- Driver software that was recently installed could be conflicting with Windows.
- A recently connected hardware device could have disputed with the system.
Windows 8 is unlike the previous versions of Windows operating system, where accessing Advanced Startup and Recovery options was easy. In Windows 8 however, it is only possible if you have already enabled the boot menu through command prompt, the PC was in good working state. To attempt opening these options, turn on your computer, and keep pressing Shift key + F8 before the Windows logo appears. In case of no effect, you would need to have a Windows 8 installation disc or an earlier created Windows 8 USB recovery drive to boot from.
- Once you have connected a bootable USB recovery drive or inserted installation DVD
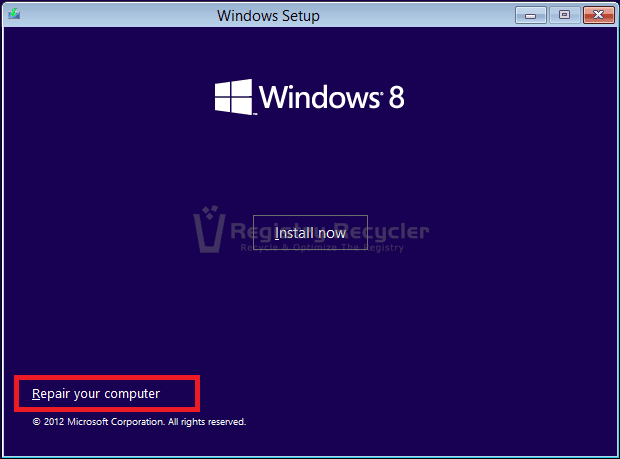
- The system will display a welcome screen, titled as Windows Setup
- Click Repair your computer or press R key on this screen to load the Recovery Environment (RE)
- In modern Choose an option interface, what you have to do is click the Troubleshoot tile
Troubleshooting Methods
Following this instance, you have multiple options on how to troubleshoot your system. This article entails the utility of each one of these tools, but you would have to choose one or more, in accordance to your own situation.
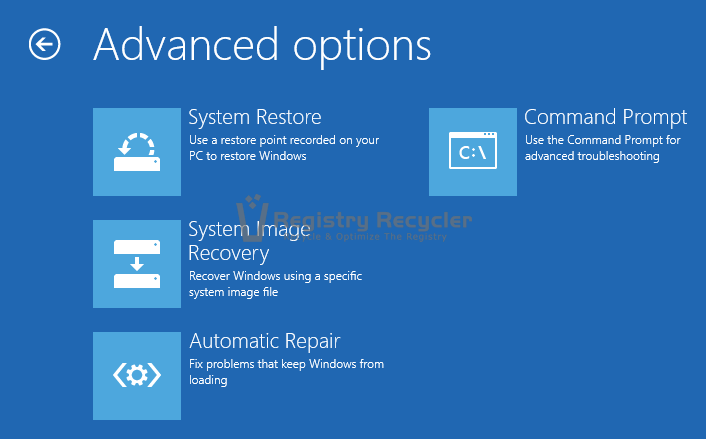
Automatic Repair – The first thing you should try is letting the system find a way out on its own. Within the Advanced options on Troubleshoot menu, you can just click the tile stating Automatic Repair. It will ask you to choose a user account and continue, followed by diagnosing and repairing processes. If in case the tool fails to diagnose the issue, it will notify you with a message directing back to the Advanced options. Do not worry, as you have other options in the queue.
System Restore – This is a reverse button taking you to a previous state of Windows 8, where everything was just fine. To opt for this one, you or system must have created a restore point recently. The restore points are saved on your drive and are automatically detected by the system. By performing a restore, all the settings and applications incorporated after the restore point was created, will be lost. It is therefore advised to create a fresh restore point at short intervals or after every new program installation. To reach the tool, please click Advanced options on the Troubleshoot screen.
Fix Boot Loader with Command Prompt – As stated earlier, issues with Boot Loader can be a foremost reason why your system might be failing to boot. Therefore, you are advised to troubleshoot it to fix Windows boot failure. The procedure for fixing the said problem can be found under this link.
System Image Recovery – This tool performs same actions as that by system restore, but in a different manner. If you have not recently created an image of complete settings of your Windows 8, the tool will likely move towards the default settings, just like a reset, conceding your files, data, applications, and settings. However, in case of having a recently created system image, you can retain the changes made until the image was created. Please note that system image is not stored on your system drive and you would have it backed up on a separate disc or drive.
Refresh your PC – This is a kind of re-installation with some added suitability. Choosing this option will turn back your Windows 8 operating system to a factory state, reconfiguring the settings. It does not bother your personal files and data; however, it does affect the installed applications. The apps, which came in pre-installed on your new Windows 8 PC and/or downloaded and installed from Windows Store, might be revived back automatically. While, those downloaded from websites or set up from discs would be compromised. However, a list of removed apps will be placed on the desktop of refreshed Windows. Click Refresh your PC without Affecting Files to successfully recover your system via this option.
Reset your PC – This option needs to be accessed as a last resort, when all other troubleshooting tools fail to help in your situation. Unlike Refresh your PC, this is more of a clean install, which removes every bit of your data on the system drive and set up a fresh copy of Windows 8. While proceeding with this option, you will lose all your files, applications, and custom settings.
If neither of the suggested tools resolves your concerned situation, you must be encountering a hardware issue. Therefore, you are advised to identify the hardware that is not allowing system to start/boot. Remove and replace your hard drive and memory stick each a time, and restart the computer. Alternatively, connect your hard drive to another PC nearby and see if it works properly or not.


 How to Fix USB Drive Issues After Installing Windows 8.1
