Hard Disk Drive (HDD) is the vital storage component of your computer. Although, the use of Solid State drives is considerably emerging with the advancing technology, yet the Hard Disk drives hold their significance. A healthy and well-managed hard drive ensures an enhanced system performance and adaptable storage capacity.
For common PC issues, Junk files unclogging, boosting System performance, speeding up Internet and other underlying Windows concerns, we recommend using this tool.
- Step 1 : Download Systimizer ‒ PC Cleaner & Internet Booster (Effective with Windows 10, 8, 7 & XP)
- Step 2 : Click "Scan" to analyze your PC
- Step 3 : Click "Fix" to wipe out all bumps
Highlighted in this text, you will find some valuable ways to manage and optimize your hard drives for a maximum output. By following these given methods, you can extract some extra speed from an existing old hard drive. See the instructions below for modifying HDD settings.
Partitioning
Partitioning is one of the useful ways to manage a hard drive and the information written on it. You can categorize your files and data into separate partitions for easy access or retrieval. Always try to keep system files separate from your personal stuff by allocating a separate partition for it, also called as system drive. This will avoid the deferral time while consulting the system drive. Moreover, if you are planning to have a dual boot or multiple operating systems, using a different partition for each will keep things organized. The process of creating new partitions can be carried from within your current operating system, easily through the Windows partitioning tool. See below to get started.
- Go to Control Panel and click System and Security category
- Subsequently, click on Administrative Tools followed by Computer Management tool
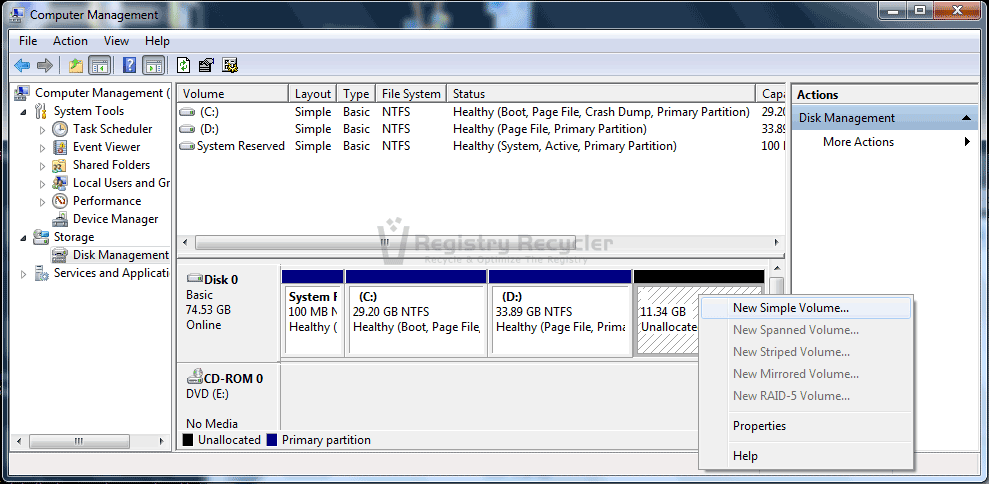
- Select Disk Management under Storage in the left pane of Computer Management window
- In the middle pane, you can view the unallocated capacity of your hard drive
- Right click this area and choose New Simple Volume
- A wizard will appear titled New Simple Volume Wizard, click Next button on this wizard
- Specify Volume Size in subsequent screen by entering the number of MBs and click Next button
- Assign Drive Letter or Path to give the new partition an identity and then click Next
- On Format Partition screen, choose the File system and click Next to format the new drive
- Click Finish button to end the wizard
As soon as the wizard finishes, a new partition drive will pop up in your Computer directory allowing you to store files in it. You can create as many partitions as you want, depending upon the size of your Hard Disk Drive.
Defragmentation
A hard drive stores new information on the built-in platters or disks. As these platters rotate, the data is written on them at a new location. Although, removing or erasing the previous files free up the space, these spaces are not filled up by the new data, until of exact size. As a result, the hard drive encompasses many free sectors of storage between the occupied sectors, thus creating fragments. While the hard drive is fragmented, its performance relatively lessens as it takes time to retrieve the data over an uneven data surface. To retain and sustain the productivity of a hard drive, it is generally suggested to defragment the partitions, if fragmented. You can set a periodic schedule for this purpose to relief yourself from this liability. To get it done, follow the steps below.
- Go to your Computer directory listing all your partitions
- Right click any partition and go to its Properties
- In the Properties window, access the Tools tab and click Defragment now button
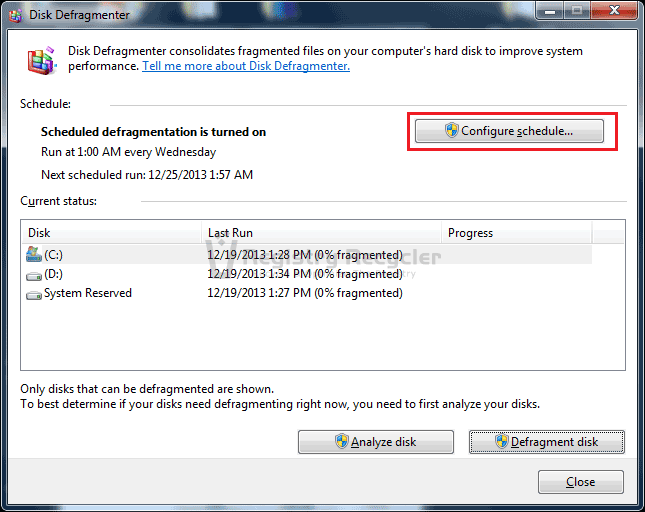
- In the Disk Defragmenter window select each drive and click the Analyze disk button
- If you find the drive as fragmented, click the Defragment disk button to mend it
Put Defragmentation on Schedule
- On the same Disk Defragmenter window click the button stating Configure schedule
- Check the option stating Run on schedule (recommended)
- In the appearing box, choose Frequency, Day, Time, and Disks to defragment
- Click OK to finish the schedule configuration
By doing so, the system will automatically and regularly perform the maintenance action according to the set schedule. Moreover, you will not be disrupted by the process through unnecessary notifications.
Cleaning
Cleaning here, does not mean to scrub the hardware physically with some laxative tool, but through the removal of temporary or unnecessary files and data. There are a number of archives, which store temporary information to assist you with quick browsing. However, these archives can result in a sluggish performance, if not cleared occasionally. Let us give you an idea on how to lessen the load on these data collections.
Recycle Bin
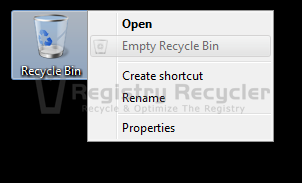
- Right click the Recycler Bin folder on your desktop screen and choose Empty Recycle Bin
Browsing History
- Type Change temporary Internet file settings in Start menu search and click it in results
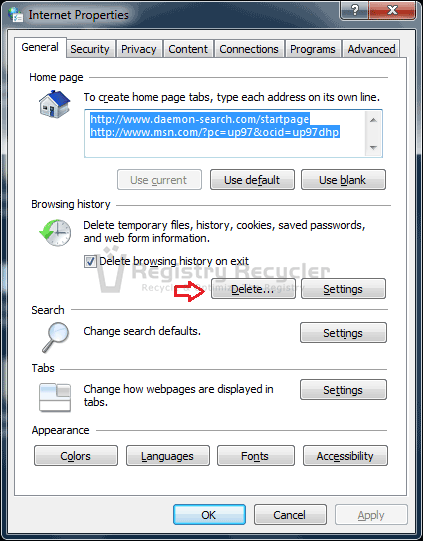
- On General tab of Internet Properties, click Delete button under Browsing history section
- A new dialog box will appear listing items of temporary data
- Among these items, check Temporary Internet files and website files
- Click Delete button on Delete Browsing History box and then OK in Internet Properties box
Windows Registry
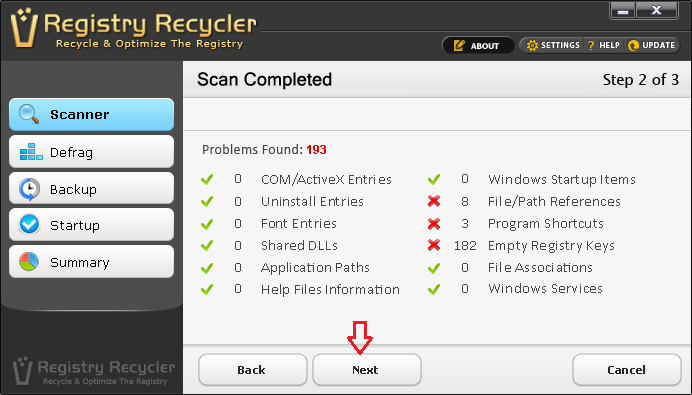
- Use reliable free registry cleaning application such as Registry Recycler to scan the registry
- Remove the detected errors to keep your registry clean
- Defragment the registry to make registry entries more organized
Apart from these data hubs, explore your drives to identify the unused and unwanted data residing on these partitions. Delete this data to free up the space and increase the speed of your hard drive. This process here for clearing browsing/cached data is limited to Internet Explorer. You can use pertinent ways for different web browsers.
Pagefile
Pagefile is the dedicated space on your portioned drive, which is used by the system to store launched, yet inactive programs and applications. This portion of the hard drive storage is also called the Virtual memory and can be found in the form of pagefile.sys in a partitioned drive. The mechanism unjams the RAM, allowing it to be used by active processes. Although, this would speed up the performance of currently used programs, however retrieving opened but inactive applications would take a while. In an overall context, Page filing accelerates the system performance by empowering RAM to have more capacity. At some instances, Page file is also referred to as supplementary RAM. Given below is the procedure to create page file in a partition.
- Right click Computer and choose Properties to bring up the System window
- Click Advanced system settings located in the left pane of System window
- On the Advanced tab of System Properties dialog box, click Settings button under Performance
- In the Performance Options box, go to Advanced tab
- On this tab, click Change button to open up the Virtual Memory box
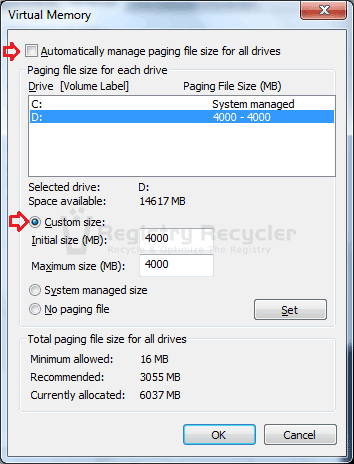
- To put the system in charge, check Automatically manage paging file size for all drives box
- If you want to set different preferences, uncheck the above option and proceed with following
- Select each drive and choose between the given three options
- Click Custom size, if you want to assign an exact figure depending upon the size of your drive
- Click System managed size, if you want to let the system identify this size accordingly
- Click No paging file, if you do not want the drive to be used for paging file
Through all these approaches, your hard drive will remain in the best of its performance with an increased lifetime. Please note that not all the methods are beneficial for a Solid State Drive, especially the defragmentation. Check Solid State Drive (SSD) optimization guide to know more about it.
 How to Fix 0xc0000225 Boot Error in Windows 8.1
