Fix Windows 10 Creators Update WiFi and Internet Connectivity Issues
PC Problems, Windows 10In today’s globalized and fast paced world, technology is evolving day in and day out. The internet serves as a catalyst between all forms of technology and the human regime. It’s no more just a source of information but a primary necessity in our everyday productivity.
For common PC issues, Junk files unclogging, boosting System performance, speeding up Internet and other underlying Windows concerns, we recommend using this tool.
- Step 1 : Download Systimizer ‒ PC Cleaner & Internet Booster (Effective with Windows 10, 8, 7 & XP)
- Step 2 : Click "Scan" to analyze your PC
- Step 3 : Click "Fix" to wipe out all bumps
Softwares and applications including operating systems are becoming more and more internet oriented with a necessity of Online Presence, and require a stable and swift internet connection. The same specifically applies to the relatively new Windows 10. But with its latest Creators Update many users claim to have experienced internet connectivity issues ranging from more common issues like Wi-Fi connectivity to rather ambiguous ones like slow internet speeds.
Internet connectivity and Wi-Fi issues in Windows 10 particularly after the roll out of Creators Update can be addressed step by step with the following tweaks and methods. It is however highly advised to merely restart the computer and the internet router. Further, to eradicate external factors malfunctioning, check all power and patch cables are connected properly, WiFi device is turned on and connected to the network. Confirm if this exercise resolves the problem before advancing to the below solutions.
- Using Windows Network Troubleshooter
- Clearing Browsing Data (Cookies, Cache and Browser History)
- Resetting Network Adapters
- Updating Network Adapters
- Resetting Internet Protocol (TCP/IP) Settings
Using Windows Network Troubleshooter
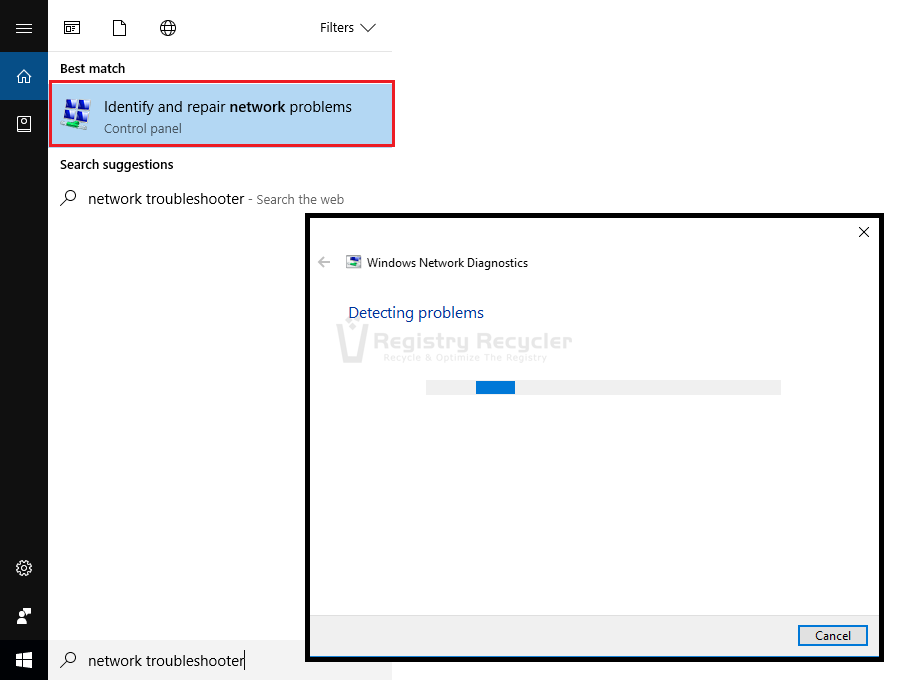
The easiest and the initial step that ought to be taken in Wi-Fi and Internet connectivity issues, is using Windows own Network Troubleshooter. Windows 10 Network Troubleshooter diagnoses disorders in internet connectivity and automatically applies necessary fixes to repair the problem.
- Click Start menu
- Type ‘network troubleshooter‘ in the search box
- Click on Identify and repair network problems from the results
The troubleshooter will attempt to fix the issue. Whether or not internet access has been regained can be checked by going to the web browser.
Clearing Browsing Data (Cookies, Cache and Browser History)
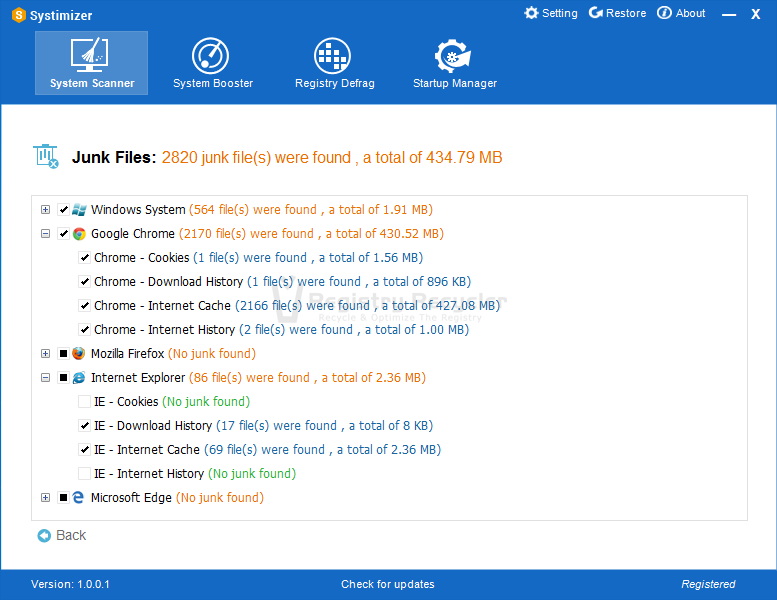
This one does not qualify as a Wi-Fi connection error nonetheless it certainly is a troublemaker which causes no internet connection. Not always but junk data can be a culprit of disrupting the global communication link. An instinctive step in troubleshooting internet problems is by clearing out all browsing data (Cookies, Cache, and Browsing history). Browsers tend to store various types of information on the user device to ensure a tailored and consistent internet experience. These chunks of information however over the time can stack up and cause internet browsing issues. To make sure you get the most optimum internet speeds it is recommended to regularly clean up all browsing data.
Clearing browsing data for Google Chrome:
- Open Google Chrome app
- Go to Settings
- Expand Show advanced settings at bottom of the screen
- Under Privacy, click Clear browsing data
- Choose a time period of your liking
- Check types of information you want to remove
- Click on Clear browsing data
Clearing up browsing data in Microsoft Edge:
- Open Edge
- Click Hub icon at the top right corner of the window
- Then click Choose what to clear under Clear browsing data
- OR just Press Ctrl+ Shift + Delete to reach browsing data
- Check the items you want to clear
- Click Clear button
Browsing data and junk files are an inevitable by-product of internet browsing. Cleaning them is highly recommended on a regular basis but cramping up these files from different browsers and doing it periodically, despite being a fairly less complicated process, it can be time consuming which can be easily obliterated in everyday computer usage. An easy and a much efficient approach in retaining clean from browsing data junk is by installing a PC junk cleaner and internet optimizer, such as Systimizer which automatically and routinely does all the task mentioned above.
Resetting Network Adapters
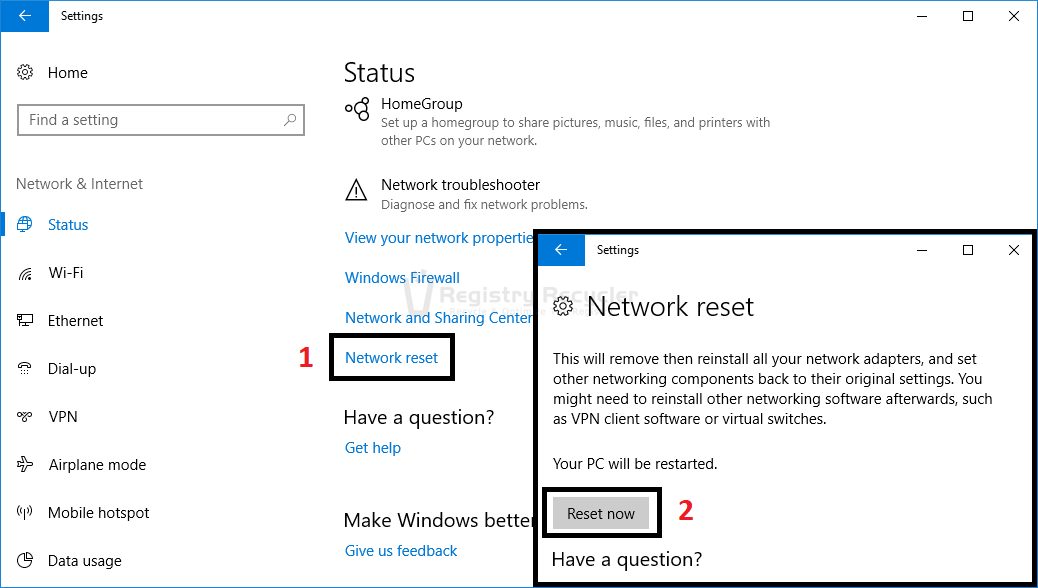
After updating to Creators Update another perpetrator to address, for Wi-Fi and internet connectivity issue, is network adapter(s). Resetting it can do the magic.
- Open Settings from Start menu
- Click on Network & Internet
- On Status tab click Network reset option
- Click Reset now button
Note: Requires rebooting Windows 10.
This restarts all Wifi and Ethernet adapters to their default configuration. All network adapters are reinstalled and Wi-fi networks require reconfiguring after the reset.
Updating Network Adapters
Next in the list of wrongdoers falls an outdated network driver. Outdated and old drivers quite often fail to deliver the network adapters maximum performance.
Drivers for networks adapters are updated by default through Windows Updates. However the install can be forced by user.
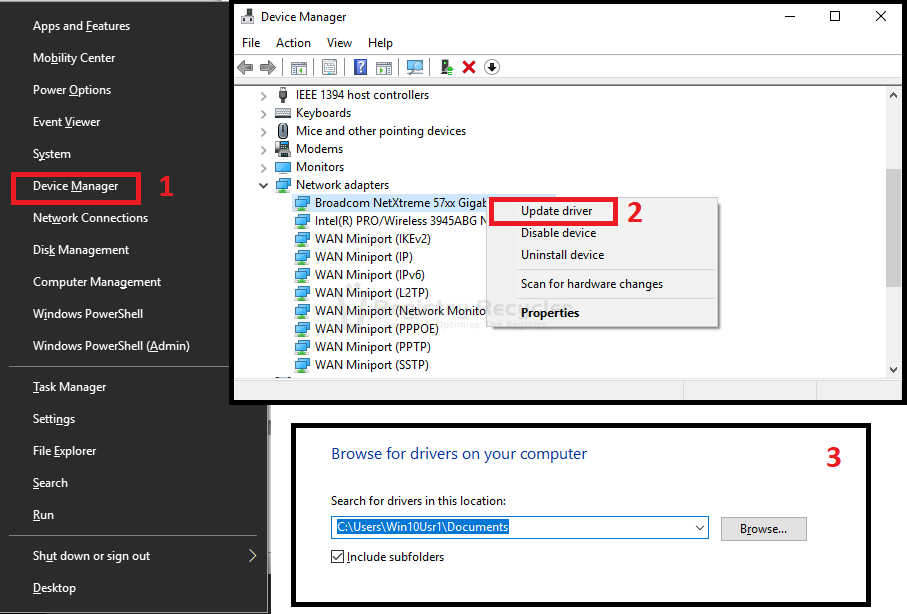
- Press Windows key + X to open Power User menu
- Select Device Manager from the appearing menu
- Click and expand Network adapters.
- Select the concerned adapter and right click it
- Click on Update driver
- Click Search automatically for updated driver software
Installing network driver manually:
If the above directives flopped in updating the network adapter, the driver might need to be installed manually. For manual installation check adapter’s name and model from the above mentioned steps. Download driver software from the manufacturer’s website and simply double click to install.
In case the driver you downloaded has no installation file and rather files like .inf and .sys then go through underneath procedure:
- Press Windows key + X to open Power User menu
- Click on Device Manager
- Click and expand Network adapters
- Select the adapter and right click it
- Select Update driver
- Click Browse my computer for driver software
- Click Browse and locate the downloaded driver
- Follow onscreen steps and finally click Close
Rolling back the network driver to a previous version:
In some cases new updates to the network adapter driver might be responsible for the loss of internet and Wi-Fi connectivity. This can be ironed out by rolling back to a previous version of the LAN Card driver that was already in use prior to the update.
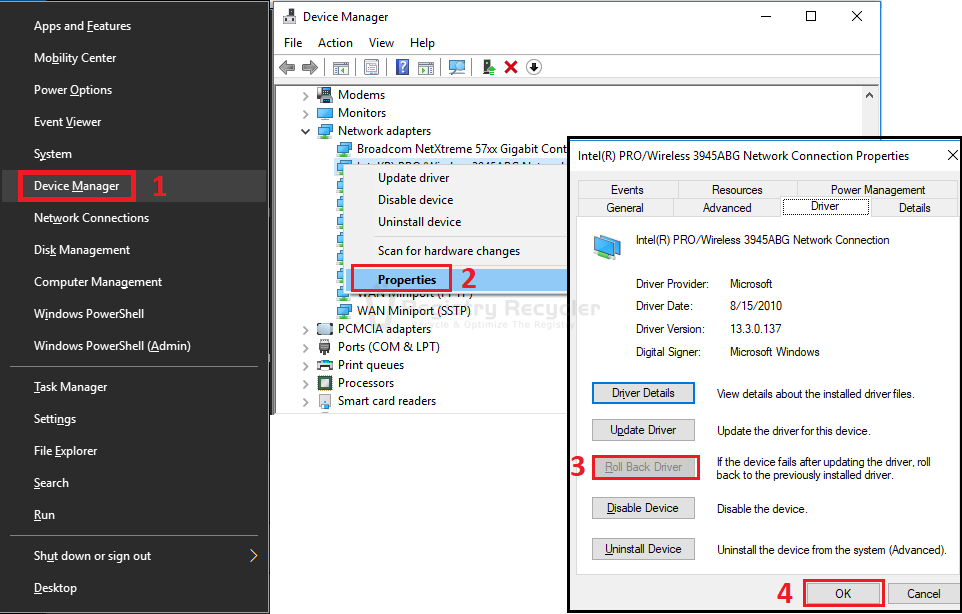
To revert back the network adapter driver, beneath are the set of instructions:
- Right click Start button to open Power User menu
- Click on Device Manager
- Click and expand Network adapters
- Select the adapter and right click to select Properties
- On the Driver tab click Roll Back Driver
On completion of the process, open your browser to check if internet access has been restored.
Uninstalling network drivers:
Internet still not reachable the outrage may be to be caused by a particular network adapter not working properly, uninstalling and reinstalling it could most probably solve the problem. For uninstalling a LAN adapter driver:
- Access Power User menu to open Device Manager
- Click and expand Network adapters
- Right click the troubled adapter and select Uninstall device
- Click Uninstall to confirm when prompted
Once the driver is uninstalled successfully, it can be reinstalled by pursuing the steps mentioned above for the installation of network adapter drivers.
Resetting Internet Protocol (TCP/IP) Settings
Rarely though, problems with Wi-Fi and internet connectivity can crop up because of improperly configured or corrupted Internet Protocol (TCP/IP) settings. These settings can be accessed via Command Prompt and NetShell utility. It is advised to use this method if none of the above mentioned solutions were able to restore internet access.
The approaching instructions would allow you to successfully reset the Internet Protocol settings for regaining internet access. Accessing these settings requires administrator privileges. Make sure you acquire admin access to Command Prompt.
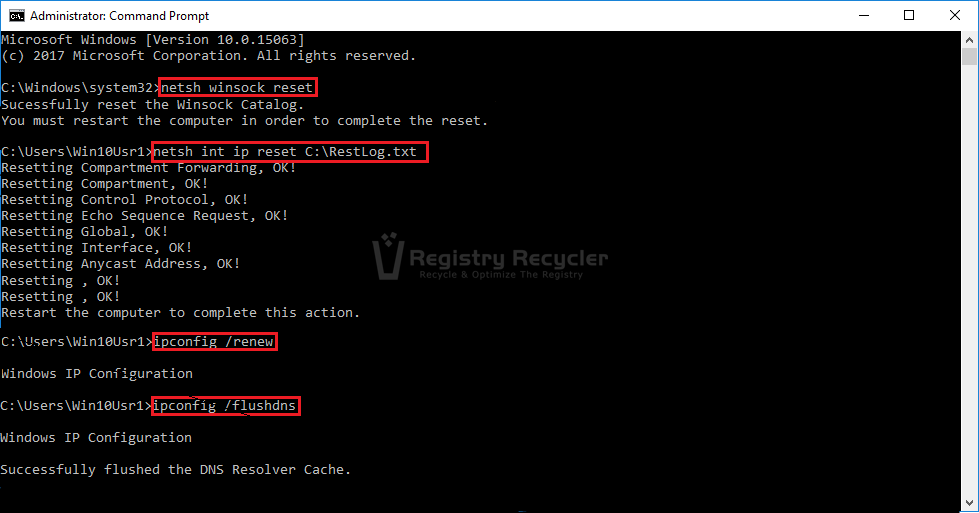
- Open search box by clicking Start menu
- Type ‘cmd‘ and run Command Prompt as administrator
- Type in ‘netsh winsock reset‘ and Enter for resetting Winsock Catalog
- Type in ‘netsh int ip reset C:\RestLog.txt ‘ and Enter to reset TCP/IP Stack
- Type in ‘ipconfig /renew’ and Enter to renew IP address
- Type ‘ipconfig /flushdns’ and Enter for clearing DNS cache
- A Windows reboot is required for the settings to apply
If these solutions end up not solving the internet connectivity problem, you might have to contact your ISP (Internet Service Provider) for an in depth investigation.
 7 Common Problems with Windows 10 Creators Update – Fix It
