Fix IRQL NOT LESS OR EQUAL Stop Error (0x0000000A) in Windows 8.1
PC Problems, Windows 8.1Windows operating system retains its characteristic of displaying Blue Screen of Death (BSOD), while a serious issue is triggered within the system. Many users of Windows 8.1 have also reported to receive such display with an error specified as IRQL_NOT_LESS_OR_EQUAL. This is a common code of expression in several of the past versions of Windows operating system. Although, BSOD looks horrible on the screen, it is a responsive instance suspending your login session to prevent data loss. Learn why this error occurs and how it could be responded for an optimum performance.
For common PC issues, Junk files unclogging, boosting System performance, speeding up Internet and other underlying Windows concerns, we recommend using this tool.
- Step 1 : Download Systimizer ‒ PC Cleaner & Internet Booster (Effective with Windows 10, 8, 7 & XP)
- Step 2 : Click "Scan" to analyze your PC
- Step 3 : Click "Fix" to wipe out all bumps
Why does IRQL_NOT_LESS_OR_EQUAL occur?
The issue pops up on your screen, when a memory address triggers an unauthorized access. It could be either a kernel-mode process or a device driver that tries to access this memory address without prior permissions.
Any program refers to a part of memory by using a respective pointer. The pointer contains coded values that are pointing towards the memory location. However, if these values are corrupted or incorrect, they direct the application to an unapproved memory portion, thus causing an error. Such an occurrence in a user mode program results in an access violation, while that in a kernel mode produces Stop error 0x0000000A message with BSOD.
In Windows 8.1, the error could have sourced right from the time of upgrade from Windows 8 to 8.1, due to an incompatible backup tool, device driver, antivirus software, or system service.
How this issue can be chucked out?
As described earlier, there are multiple reasons why the error occurs, and therefore it might have multiple solutions based on its source. In this section, you will catch several troubleshooting techniques based on the actual cause of inconvenience. These solutions are,
Method 1: View System Log: System Log is a journal that records every event of Windows operating system. Each time the said error occurs; it is logged in this database and remains there until you clear it out. To know the exact case of distress, you are suggested to open the log and locate the event with the error.
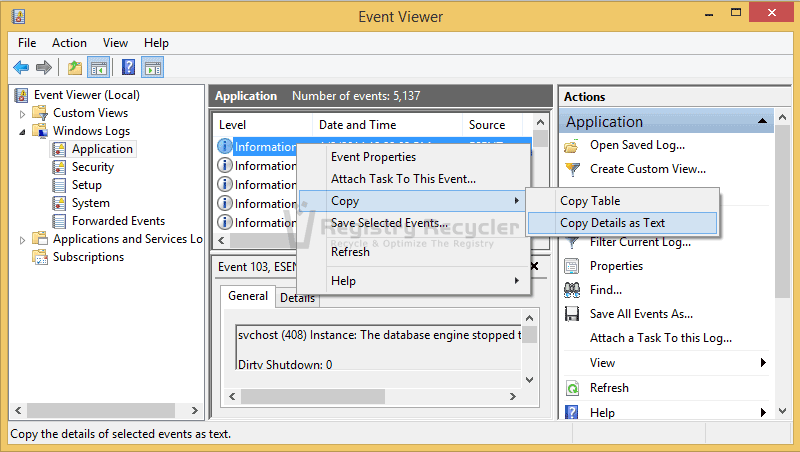
Event Viewer is the place where to find system log details. To contact this database, go to Control Panel and access the System and Security category. Click Event Viewer within Administrative Tools to open up its Window. Navigate through the tree in left pane to view System under Windows Logs. Locate the error in the list of events and Copy details as text in the right pane. Paste the copied info in a Notepad file.
The info acquired from system log can either be provided to a technical expert or shared online to have some useful recommendations on it.
Method 2: Run Hardware Diagnostic: The specific hardware that can be questioned in this situation is system memory. Make sure you are not cursing a well-configured Windows 8.1, due to a neglected bad RAM. It is quite possible that the issue origins from the hardware itself.
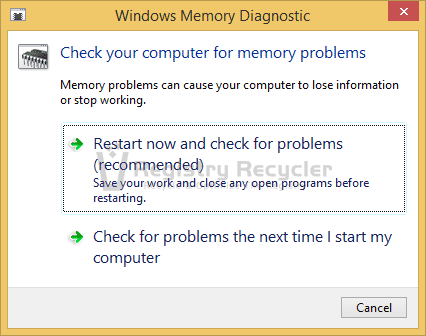
In order to verify the integrity of your system’s memory, you can use Windows’ own diagnostic tool. To access this tool, type Memory Diagnostic on the Start screen and click on Diagnose your computer’s memory problems to bring up a dialog box. It will ask you to perform the check by either restarting immediately or on the next restart. Opt for the immediate one to get going.
The system on restarting will carry a scan on the memory and come up with errors, if detected. If the scan finds your RAM to be problematic, you will need to replace this piece of hardware.
Method 3: Disable Memory Caching: By now, it should be clear that this is a memory related issue. One of the ways to troubleshoot it is by disabling the memory caching option. In point of fact, it is called the BIOS memory caching and therefore should be disabled from basic input output settings (BIOS).
You do not need to boot in to operating system while working with BIOS. Turn you PC on and press the BIOS setup key to enter the settings screen. We cannot specify a single key in this regard, as the motherboards of different makes have their own respective keys. You can search the internet to know yours.
Please be cautious, as a single slip-up while making changes in BIOS can leave you in a state of trouble. As BIOS is a sensitive area to work with, make notes of all the instructions, and perform each step with extreme care.
While you reach the BIOS screen, look around for options stating memory settings. Access these options to view and disable the Memory Caching feature. Search the internet to find an exact and manufacture specific procedure to disable memory caching.
Method 4: Certify Peripheral Devices: Before moving on to fixed hardware components, make sure that the plugged-in devices or their drivers are not causing any issues. Such devices are the externally connected webcam, microphone, multimedia keyboard, mouse, display screen, printer, external storage drives, and modems.
To certify that such peripherals are not causing the IRQL_NOT_LESS_OR_EQUAL issue, remove all such devices and disable their drivers, if any. You can still leave mouse or keyboard to operate it. Keep watching the system. If the error does not appear for a long time, any of such removable devices or its driver is making trouble.
Now, start connecting each device at a time and enable its driver software, if any. Keep proceeding until you bump into the same error with BSOD. Identify the concerned device and avoid using it again. Or else, search for the driver utility to run this device in compatibility with Windows 8.1.
Method 5: Perform a Clean Boot: Clean Boot is the way to start your system with minimum possible processes and services. In this way, the third party drivers and applications would not conflict with the memory, by not loading drivers and applications on startup. You can also access your operating system through the Safe mode to avoid these actions.
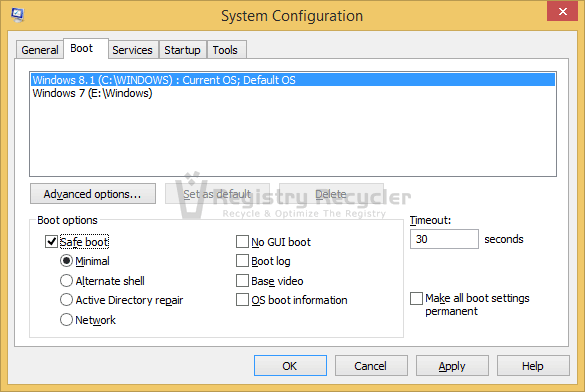
Type msconfig on your Start screen and hit Enter to open System Configurations. Go to its Boot tab and choose to perform Clean Boot or Safe Boot. System will then restart with temporarily disabled processes. Once there, try running each application (those enlisted in startup) at a time and identify the one in conflict. Subsequently, the program should be fixed, updated, or removed to avoid inconvenience in future.
However, this is only possible, when you are able to boot in to your user account. Users experiencing an unbootable system should try out a system restore.
Method 6: Perform System Restore: System Restore is not itself the ultimate solution for the issue, but it leads to one. If the IRQL_NOT_LESS_OR_EQUAL error has appeared just recently and the system was initially working nice after upgrading to Windows 8.1, you or the system itself must have created a restore point with good configurations. Turning back to a previous state of settings would undo all the changes you carried after the restore point was created. The restoration methods depend on your ability to boot in.
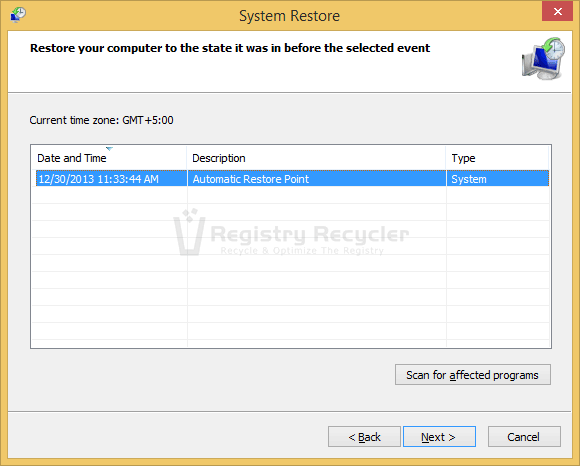
If the error is used to occur while you are logged into your Windows account, you can perform a system restore from within the login session. For this purpose, type system restore on your Start screen and hit Enter key to begin the wizard. Choose a restore point and find your PC in a state when that point was created.
In the other case, if you are unable to boot in or the error occurs right at the beginning not letting you perform any action, you would need to access the utility via Advanced Startup Options. In both Windows 8 and 8.1, it requires enabled F8 key to access these options on system startup. However, if you have not enabled it already, all you would need is either a Windows 8 installation media, or Windows 8.1 recovery drive. Navigate to Advance options of Troubleshoot and click to choose System Restore.
In an unfortunate case, where you have not created any restore point after upgrading to Windows 8.1, you would need to roll back to Windows 8 and try upgrading to Windows 8.1 once again.
Method 7: Roll back and Update again: This is to be performed in the situation, when you are not able to boot into Windows 8.1 with your own or any other user account, and you have not even created a restore point in this upgraded version.
An easy roll back is possible if you have created a system image backup of Windows 8. For executing this, it is needed to insert Windows 8 installation disc or Windows 8 recovery drive and reach Advanced Startup options. Go for Advanced options within Troubleshoot to Restore System Image. Please note that the backup of system image must be on a disc or an external storage drive, as you cannot access the directories within your hard drive. After selecting the desired image, you will be taken back to Windows 8, when the image was created.
In contrast, if you do not even have a system image on external storage, or it exists in your unbootable system, you are advised to do a clean install of Windows 8. However, you will lose the programs and applications installed on the system.
Once you are back to Windows 8, install all Windows updates, disable device drivers, and disable antivirus software, before upgrading to Windows 8.1.
On the occasion, when you have performed all the measures described in above section, you will surely be able to eliminate the BSOD and said error message. Windows 8.1 offers you the enhanced features of Windows 8 and overcomes its issues.


 Fix BAD_POOL_CALLER Stop Error (0x000000C2) in Windows 8.1
